Followers

Wednesday, 30 November 2016

And Now For Something Completely Different...

I was recently contacted by Chalkola and asked if I would review their chalk markers. This sounded like fun so I said yes. I received two sets of pens to use for free in exchange for an honest review.


I received 2 packs, neon (fabulous bright colours) with a 6mm nib


and Earthy colours which are soft muted colours. These are lovely chunky pens with a 3mm bullet nib. The pens have to be primed before use by pumping the nib. Once the colour starts to flow it's very even and the colours are exactly as shown on the pen lid. They are designed for non porous surfaces like white boards, glass and ceramics etc.


yes indeed! they write beautifully on a laminated surface
and wash straight off with a damp cloth. Although your fingers might get painty this also washed off with a damp cloth, and there is no smell at all.

I decided to put the neon colours through their paces first.
They are not called neon for no reason. Fab bold colours that I used on this tile. I just coloured the ceramic tile with the orange pen, then scribbled the purple onto a craft mat and sponged through a stencil.
Edged with a ruler in green. Of course this just wipes straight off the ruler. I'm drying each layer with the craft gun, and it dries to a lovely chalky finish. The colours do not mix at all. You can put white on top of black and you will just see the top colour.
I put the colour straight onto polymer stamps and stamped away. I worried about the next bit as I thought I would test them with spray varnish. Nothing moved at all! So, if you don't heat set them they wipe clean with a damp cloth, if you do set them they become permanent. 


Next I tested the Earthy colours on glossy card. 
They fit into an airbrush gadget so I was able to spray them through a stencil (which cleaned up with a damp cloth - yay)
These colours are a bit more muted but give a lovely soft watercolour effect. 
Again I'm drying each layer. These colours stamp beautifully too, just paint the stamp directly.
You can dye ribbon too!.


I love these chunky pens! They would be great if you were crafting with children as they are non toxic, don't smell, and clean off with water (I'm talking about the markers here lol) If you want to make them permanent add heat - obviously an adult needs to do this part.

These are the links on Amazon, and the lovely people at Chalkola are offering a 20% discount on all their products if you quote this code 20OFFSTR.
https://www.amazon.co.uk/d/Pens-Pencils-Writing-Supplies/Chalk-Pens-colour-markers-Whiteboard-Chalkboard-Blackboard/B00VVOWCSC/
https://www.amazon.co.uk/Chalk-Pens-Whiteboard-Chalkboard-Blackboard/dp/B01E17WAQO/
I had great fun trying these, for me the best bits were the fab colours, very comfortable to use and these markers have lots of ink in them, and the easy clean up. I suppose I've not used them how they were meant to be used, but yes they also do exactly what it says on the tin, and so much more.

Have a great day, and thanks very much for looking x

Tuesday, 29 November 2016

I'm Happy

Good Morning and Happy Tuesday! I'm well and truly into Christmas card making mode at the moment as we go away on Thursday and when we come back it will be very near to Christmas. This is one that I made with my favourite (for this week, my favourites change daily) Tomorrow Doesn't Exist plate from Visible Image.


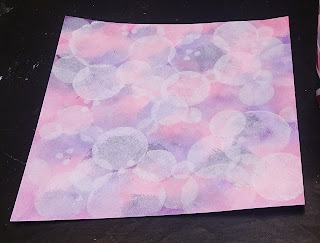
This one is for my sons girlfriend and I didn't want it to be too traditional, so I chose my pink and purple DecoArt paints...


and sponged away with a piece of foam.


Then out with my trusty home made stencil


and the white gesso to build a bokeh background. I really do like this as a background as the images really pop from it. 


I decided to chop a bit off to make a rectangular card and used this as a practice to make sure my embossing powder showed up.


I stamped my happy girl first and embossed with black EP. It's not a traditional Christmas stamp, but it's how I feel at this time of year! Then came the words from Go To Christmas Words, and Happy from the Tomorrow Doesn't Exist plate. There's also stars from Universal and edgy from De-stressed backgrounds.
So I didn't forget it was a Christmas card I gave my girl a felt Santa hat and a bit of bling. 

For lots more inspiration please visit our blog where you can access the shop and projects gallery.
There's also our facebook page and group where there's new inspiration every day.

I'm also entering this into the That's Crafty 'grungy' challenge - who says grungy can't be pink :-)

I hope you (and she) likes my card, have a fun week and thanks very much for looking x


Sunday, 27 November 2016

Alcohol Inks for PaperArtsy

This fortnight the challenge at PaperArtsy is alcohol inks and pens. As soon as I saw this project by Shari I knew that I wanted to try the technique. I don't have any canned air, so I used a good old fashioned drinking straw!


I'm really please with how it turned out, and I will definitely be doing this again. I've used stamps from JOFY set 14, and that's it, a bit of stitching and job done.
Right, back to the Christmas cards again! Have a great week, and thanks very much for looking x

Friday, 25 November 2016

The Next Scream You Hear...

A couple of months ago I was lucky enough to win the challenge at Lost Coast Designs and now I can show you what I've made with my fab new stamps.


I promise there is more to it than this, and if you click here, you'll be whisked as if by Black Friday magic to the full piece.

Thanks very much for looking, and have a great weekend (don't spend toooo much) xx

Wednesday, 23 November 2016

Only 32 More Sleeps

'till Christmas yaaaaaay! I love Christmas, but hate making Christmas cards. I get all my stamps out and then make something else instead. Well you need nice new coasters at Christmas - have I said Christmas enough now :-)


I love these Visible Image Christmas stamps! On this one I've used Winter Wonderland and Go To Christmas Words There's also lots of Frantage embossing powder, and the tiles have been painted with DecoArt gesso and Media paints, and sealed with Satin Finish Varnish.

And this one is using the Enchanting Snowflakes and Go To Christmas Words sets. I love the font on these, perfect for the inside or outside of a card. Speaking of which, I'd better go and make some!  
Don't forget there's a mega Black Friday sale at the Visible Image Store which starts tomorrow at 10pm. Then it's only 31 more sleeps!
Have a great week and thanks very much for looking xx

Tuesday, 22 November 2016

Reach High

Good morning, and Happy Tuesday.  It's my turn today to share my second Country View Crafts star project. It's a double page in my small journal.


I was feeling quite bold so decided to go straight in with embossing, distress inks, and pan pastels.
I started by clear embossing the stars from this Darcy plate from PaperArtsy.


Then I added lots of Distress Inks and Pan Pastels. I've used the silver PP through the stencil.


I've stamped the houses from the same plate, and the flowers from Darcy 06 for placement.


 I've coloured the flowers directly with Fresco's, then 'whited out' the houses and re-stamped, and coloured with Fresco's and coloured pencils. The tiny house in the middle has been stamped onto a book page and cut out.


Then I've gone round the edges with black and white pencils to cover up my dodgy lines lol.


I've finished with the sentiment from the same plate, the obligatory washi tape, and some stars cut from a Seth Apter stencil. 

I really enjoyed making this, and that's now 2 things in my journal without it being a total disaster, (that's one more than usual :-D )
Hope you have a great day, and thanks very much for looking x

Monday, 21 November 2016

Joy To The World

Good morning and happy Monday. Last month I was lucky enough to win the draw over at IndigoBlu, and as well as winning some fabulous stamps I also get the chance to be a guest designer at the launch of their new Glisten and Sparkle challenge. 
This is what I made.


I started by making a master board using lots of stamps and sparkly embossing powder. As Christmas is coming and I'm nowhere near ready I knew I wanted to make some Christmas cards.
I've used Rain Droplets I chose this as part of my prize so it would be rude not to use it lol.
I also used Bauble Flourish, Large Snowflake, Joy To The WorldRetro Christmas, and Looks Like Rain Deer. Of course there's also my favourite Script Background glistening away in the background. This is an A3 sheet of card so there's lots of room for stamping. 


I've used mainly Frantage for the embossing as it's lovely and chunky and has lots of  sparkle.

Now for the scary part, time to chop it all up. This is an 8x8 piece that I die cut and put some snowy acetate behind.
I then cut this into frames and put the same snowy acetate behind.
and this is my finished card. I still have enough card left for another of these.
I still had loads left for these too.

So I made some smaller cards. Way hey that five cards done and another one nearly done. If I put these with the er one that I've made already that makes - nowhere near enough, time to flick the Christmas mode switch!
Thank you very much IndigoBlu for having me and have a great week everyone x

Tuesday, 15 November 2016

Glimmer of Light

Good morning, and Happy Tuesday. It's my turn to share a visible Image project with you, and I've been feeling very bold!  I've made a journal page, straight into the book without a safety net. 


This is the best photograph I can get as we're slightly lacking in the old daylight department.

This is lots of Distress Ink blended in patches, with some stencilling in the same colours.  I liked it, but boy was it bright, so I toned it down a bit with some gesso through a stencil. The edging stamp is from the Music on World Off plate.
Time for some fun now in building up the background. I've used Ranger Archival inks to stamp my quotes from Imagine, Dream, Inspire, and there's also circles from Universal.
I've been wanting to use the Glimmer of Light plate for a while now, but I've been in Halloween (thankfully gone) or Christmas (OMG it's getting close) mode for weeks, but today was playday!
Don't you just love this moth! He's just stamped onto the background and coloured in places with Stabilo pencils. I stamped the light bulb into the previously stamped circle, then stamped the circle again and embossed in white.

And this is the quote, stamped and embossed with black fine EP. I've just highlighted bits and bobs with stencils and Portfolio pastels. This was such fun to make once I'd got over the terrors of stamping in my shiny new journal.
For lots more daily inspiration please head over to our Face Book page.
There is also our Blog where you can find the shop and projects gallery.
If Pinterest is your thing, you can find us here.

Have a brilliant week, and thanks very much for looking x

Tuesday, 8 November 2016

Typography, Fonts and Quotes for PaperArtsy

Good afternoon and happy Tuesday. I can't believe how dark it is today, and we may wake up to snow tomorrow - it's only early November for goodness sake! Neil bless him is outside hoovering the garden - in the dark. Every day he puts on his ghost buster machine and hoovers all the fallen leaves up. You can guess what has happened by the following morning....  I think it's some sort of illness - what's wrong with a few (hundred) fallen leaves :-)
Anyhow I was lucky enough to win the PaperArtsy draw a week ago and I've been having a play with my prize - well it would be rude not to wouldn't it. I chose some Seth Apter stamps and 3 gorgeous stencils.


This is the Seth Apter ring binder. It's a lovely thick kraft card, but there's not much left showing of it now. There's just about every Fresco paint that I own on there. 

The current challenge at PaperArtsy is typography, fonts and quotes so I'm entering my binder.

Have a fun week, and thanks very much for looking xx


Monday, 7 November 2016

Day of the Dead

Hello and happy Monday. For various reasons this is a little bit late, but better late than never,  Feliz dia de los meurtos!


This is a hanging, but after 127 photographs of it swinging in and out of focus and the ever so nice shot of the broken plant pot I gave up with that idea and laid it on the floor instead!


This is a paper mache box that's been mega crackled with DecoArt paints. I've had these stamps since time began, and other than they are from USA, I've no idea who they are by.


The whole village has turned out for the celebrations for the happy couple. Together for all eternity... aaaargghhh!

I'm entering this into the Lost Coast Designs  Day of the Dead challenge, 
That's Crafty Friday 13th part 2 challenge, and
Dream In Darkness anything weird. 

Have a great week, and thanks very much for looking x